Tutorial
The following tutorial will guide you through the process of creating your first reminder step-by-step.
Sheet Template
For reminder to work correctly, your sheet needs to have at least 2 required columns: a status column to indicate whether notification has been sent and a column that holds deadline/time values. For this tutorial lets use following sheet template:

Header row is not required and is for demonstration purposes only.
Create Reminder
From the homepage, click on Create reminder button which will take you to a reminder creation screen.
Name
Choose a name for your reminder. This name is for your reference and organization purposes.

Status column
You must specify a dedicated column to indicate whether notification has been sent or not. Enter the column in A1 notation A:A.

Date time source
First select a sheet you want to use for this reminder.
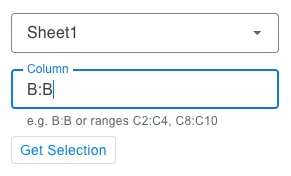
Next, specify a column where your deadline values are stored. This will also determine for which rows to send notifications. You can enter a full column or a range of rows, for example:
B:Bfor the full column B. In this case notifications will be sent for all the rows in the sheet.B2:B4, B4:B8for a range of rows. In this case notifications will only be sent for rows from B2 to B4, and B4 to B8.
You can use Get Selection button to automatically enter selected rows.

When script is run in the background, it will read the date time value from each cell, and determine whether notification should be sent.
When to notify
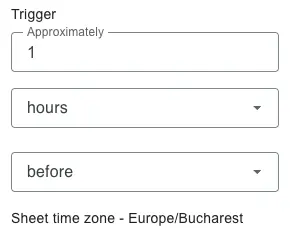
Select how many hours, days, weeks or months before(or after) to notify.
Notification time is relative to sheet time zone. If you don’t see sheet time zone make sure to manually set it for the document.

Notification
Next create a notification by clicking Add button in the notifications section.
Email notification
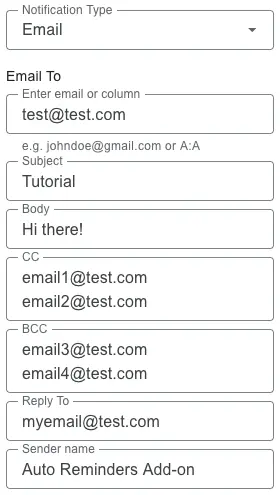
Enter email or a column in A1 notation. You have two options:
- Single email address, e.g.
[email protected]. In this case all reminders will be sent only to this address. - A column in A1 notation, e.g.
C:C. This way you can specify different email recipent for each row.
For this tutorial I am goint to enter a column that hold email addresses.
- Single email address, e.g.
Enter email subject.
Enter email body.
Enter CC recipients. You can specify multiple email addresses by putting each on a new line.
Enter BCC recipients. You can specify multiple.
Enter which email should be shown to recipient as reply-to.
Set sender name or leave blank for your current user name.

Done
Click save and your reminder is ready! It’s recommended to create a test reminder to see if everything works as expected before making your processes reliant on the add-on.